Build sheet · Boxed zippered pouch · No. 1
The Breviary Pouch
A lined, boxed, zippered pouch in cotton duck canvas, sized to keep a thick prayer book from being scuffed by everything else in a backpack. Written for somebody who has never sewn and owns nothing. The pattern is generated, not drawn, so the next book gets its own.
01 · The object
What this is, and what it is not
Abrasion protection for a book carried loose. Read this part before you spend money.
The book is 7.3 inches tall, 4.75 wide and 3.0 deep, in a leather zip cover, and it carries eight satin ribbon bookmarks. The ribbons decide the hardware: a nylon coil zipper, never metal teeth. Metal teeth are stamped and have edges, and dragging satin through them shears the fibres. A coil crushes a ribbon and lets it go again.
This pouch stops the book being scuffed by a laptop charger. It will not stop the book being crushed by a dropped backpack. Impact protection needs foam, and foam on a borrowed domestic sewing machine is how borrowed sewing machines break.
02 · Supplies
Everything to buy or borrow
US retail, 2026, before tax. Three tables: what gets used up, what you have to own, what you can borrow.
Consumables
| Item | Qty | Specification | Cost | Cheaper substitute |
|---|---|---|---|---|
| Outer fabric | ½ yd | Cotton duck canvas, 10 oz, 58–60 in wide | $9–14 | 8 oz duck is easier to sew. Never above 12 oz. Never quilting cotton, it will not resist abrasion. |
| Lining fabric | ½ yd | Quilting cotton, 44 in, tight weave | $6–9 | An old bedsheet. Avoid slippery polyester, it fights the feed dogs. |
| Zipper | 1 | 14 in nylon coil, #4.5 or #5, closed end | $3–6 | Zipper by the yard plus a pull, about $2. Never metal teeth. |
| Thread | 250 yd | All-purpose polyester, 40 wt | $4–6 | Any polyester all-purpose. Not cotton hand-quilting thread, the glaze strips in the tension discs. |
| Machine needles | 5 | Schmetz Jeans 90/14, plus a 100/16 | $6 | Universal 90/14 works on flat seams, deflects at the corners. |
| Total, one pouch | $28–41 | Four pouches: $63–99, about $16–25 each. |
Tools you must own
| Item | Specification | Cost | Cheaper substitute |
|---|---|---|---|
| Fabric shears | 8 in bent handle, fabric only | $16–25 | Any sharp scissors you will never use on paper. One paper cut dulls them. |
| Clear ruler | 24 × 2 in quilting ruler, ⅛ in grid | $12–18 | A metal yardstick. Acceptable, slower. |
| Tape measure | 60 in flexible | $3 | A ruler and care. |
| Marking tool | Chalk pencil or washable fabric marker | $4 | A sliver of dry soap on the wrong side. Genuinely fine. |
| Clips or pins | Wonder Clips ×25, or glass-head pins | $8–12 | Binder clips from a desk drawer. |
| Seam ripper | Any | $3–5 | None. Buy it. You will use it. |
| Hand needles | Sharps 7 or 8, with a threader | $3 | None worth the trouble. |
| Point turner | Bamboo or plastic | $4 | A chopstick with a sanded tip. Never a pen, the ink transfers. |
| Hammer | Any household claw hammer | owned | A rubber mallet, or a smooth rock. |
| Total | $53–73 | $26 with substitutions |
Tools you can borrow
| Item | Specification | Time needed | Notes |
|---|---|---|---|
| Sewing machine | Any domestic machine, straight stitch, adjustable length | 2–3 h, one session | Read the machine safety section first. Ask when it was last serviced. |
| Zipper foot | Must fit that machine | same session | Not optional. Confirm the machine has one before booking the session. |
| Walking foot | Same brand as the machine | same session | Optional, helps duck feed evenly. Do not buy one for this. |
| Iron and board | Steam, cotton setting | 1 h, spread out | Pressing is half of this project. A towel on a table works. |
| Rotary cutter and mat | 45 mm | 30 min | Optional. Shears and a ruler give the same result. |
| Washer and dryer | Hot wash, hot dry | 2 h, unattended | Not optional. See step 3. |
03 · Machine safety
The machine is borrowed
The failure modes below cost the owner money. Read this before the machine is in front of you.
Settings
Needle. A Schmetz Jeans/Denim 90/14 for the whole project, moving to a 100/16 for the boxed corners if the 90/14 deflects. A jeans needle has a stiffer shank and a sharper point than a universal, which is what layered duck canvas needs. Fit a new one before you start even if the one in the machine looks fine. A needle is a $1.20 consumable and a dull one is the root cause of most of the symptoms below.
Stitch length. 3.0 mm for construction, 3.5 mm for topstitching. The machine's default is 2.2 to 2.5 mm, set for dress cotton. A short stitch in duck canvas perforates the weave into a tear line and makes the machine work harder for no strength gain.
Thick intersections. Where a seam crosses a seam, stop with the needle down and turn the handwheel by hand through the stack. Always toward you. Turning it away from you can unseat the timing on some machines. If the handwheel will not turn under firm finger pressure, the stack is too thick. Do not force it.
Hammering. Before sewing across any intersection, lay it on a hard surface, cover it with a scrap, and hit it flat. Four or five firm blows. Cotton duck compresses and stays compressed. This turns an eight layer stack into something closer to five. It is the most useful trick in the project and it costs thirty seconds. Steam softens the fibres, the hammer sets them: do both, hammer second.
Stop immediately if
| Symptom | Cause | If you continue |
|---|---|---|
| A hard punch or thunk per stitch instead of a click | Needle too small, or dull, and being driven through | The needle snaps. The tip can hit the hook. |
| The needle visibly flexes as it enters | Same, or you are pulling the fabric | Bent needle strikes the hook, machine loses timing |
| Skipped stitches, or rhythmic clicking | Needle deflection, wrong needle for the layers | Ruined seam, same timing risk |
| Thread shredding every few inches | Burr on the needle eye, or a dull needle | Nothing mechanical, but the seam is worthless |
| Motor pitch drops, machine slows under the foot | The stack is too thick to feed | Motor overheats, belt slips |
| Burning smell, hot plastic | Motor strain or a jammed hook | Do not restart. Unplug it. Tell the owner. |
| The handwheel is hard to turn by hand | Thread jam under the plate | Forcing it bends the hook |
Never pull or push the fabric to help it through. Guide it only. Pulling levers the needle sideways into the hook, and that is the mechanism behind most domestic machine repairs. Never sew over a pin. Use clips, or pull each pin as it reaches the foot.
Choices made to reduce load on the machine, and what they cost
| Choice | Instead of | What you give up |
|---|---|---|
| 10 oz duck outer | 12 oz duck or waxed canvas | Slightly less abrasion resistance. Not measurable in normal use. |
| Quilting cotton lining | A second layer of duck | The pouch is limp when empty. With the book in it, no difference. |
| No interfacing anywhere | Fusible fleece or foam | It will not stand up on its own. Structure comes from the book. |
| Nylon coil #4.5 zipper | Metal teeth | Nothing. The coil is the better choice here regardless of the machine. |
| No hardware or bag feet | Clip-on strap fittings | No strap. The pouch lives inside a backpack. |
| ½ in seam allowance, trimmed to ¼ in at the corners only | ⅜ in throughout | An extra trimming step. In exchange every seam can be unpicked and resewn. |
| Boxed corners cut and stitched flat | A separate gusset panel | Two fewer seams, two fewer chances to go wrong, half the bulk at each corner. |
04 · The pattern
Generated, not drawn
Nothing here is hardcoded. Give the generator a different book and it emits a correct cut list, corner square, zipper length and printable pattern for that book. The 2027 rebuild is one command.
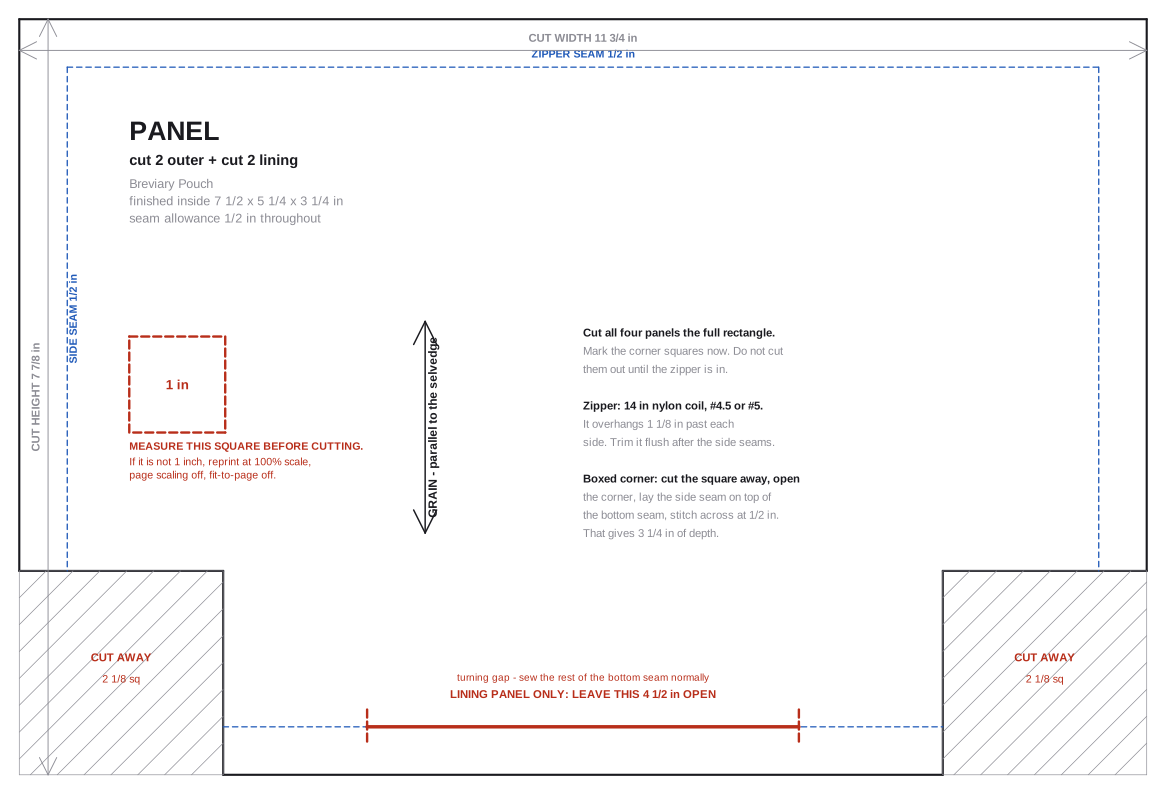
Why the corner square is 2⅛ inches
A boxed corner is made by removing a square from each bottom corner, then opening the corner out so the side seam lies on top of the bottom seam and stitching straight across. The two cut edges, each S long, lie end to end and form one raw edge 2S long. The sides fold in at 45 degrees, so the stitch line, set back by one seam allowance, is shorter than the raw edge by SA at each end.
The arithmetic, checked
Three identities relate the flat cut panel to the finished pouch, where W_f, H_f, D are the finished inside dimensions, SA the seam allowance, S the corner square, and W_cut, H_cut the panel:
D   = 2S - 2·SA            depth, from the corner square
W_f = W_cut - 2·SA - D     boxing folds D/2 into each side
H_f = H_cut - 2·SA - D/2   zipper seam, bottom seam, half the bottom face

at the target size, SA = ½ in:
S     = 3.25/2 + 0.5   = 2.125    2⅛ in
W_cut = 7.5  + 1 + 3.25 = 11.75   11¾ in
H_cut = 5.25 + 1 + 1.625 = 7.875  7⅞ in
The generator solves them forward, then re-derives the finished pouch from the cut numbers and asserts the round trip. It also checks a fourth quantity that neither formula was solved for: the stitched bottom seam, W_cut − 2·SA, must equal W_f + D, because after boxing that seam is the bottom face plus the two half depths folded up into the sides. Both come to 10¾ inches. Run --selftest and it runs all four checks over a sweep of book sizes:
$ python3 generate_pattern.py --selftest
ok  book 7.3x4.75x3.0 sa 0.5   -> panel 11 3/4 x 7 7/8,   square 2 1/8, zip 14 in
ok  book 8.5x6.0x2.25 sa 0.5   -> panel 12 3/16 x 8 3/4,  square 1 3/4, zip 16 in
ok  book 4.0x3.0x1.0 sa 0.25   -> panel 5 15/16 x 4 5/8,  square 7/8,   zip 9 in
ok  book 11.0x8.5x1.5 sa 0.5   -> panel 13 15/16 x 10 7/8, square 1 3/8, zip 16 in
ok  book 6.0x4.0x2.0 sa 0.375  -> panel 9 3/16 x 6 3/8,   square 1 1/2, zip 12 in
all geometry checks passed
It refuses to emit a pattern it cannot build: a pouch deeper than it is wide, a corner square that would reach the zipper seam, or a turning gap too small to pull the pouch through.
A second book, to show the math is general
A single volume 1962 Roman breviary, 8.5 × 6.0 × 2.25 inches. Larger and thinner.
python3 generate_pattern.py --book-height 8.5 --book-width 6.0 --book-depth 2.25
| Target book, 7.3 × 4.75 × 3.0 | Roman breviary, 8.5 × 6.0 × 2.25 | |
|---|---|---|
| Finished inside | 7½ × 5¼ × 3¼ in | 8 11/16 × 6½ × 2½ in |
| Panel, cut ×4 | 11¾ × 7⅞ in | 12 3/16 × 8¾ in |
| Corner square | 2⅛ in | 1¾ in |
| Turning gap | 4½ in | 5 in |
| Zipper | 14 in | 16 in |
| Printed pattern | 3 Letter pages | 5 Letter pages |
Every number moved, in the right direction and by the right amount. The corner square shrank with the depth, the panel grew with the book, and the zipper stepped up to the next length anybody actually stocks.
05 · The build
Twenty six steps
Every step says what you are doing, why it matters, how to tell you did it right, and what it looks like if you did it wrong. Four steps are marked stop and check. Those are the ones that ruin the piece.
The machine is needed between step 7 and step 23. A few steps inside that range are table work, but they sit in the middle of the sequence, so book one session covering 7 through 23. Steps 1 to 6 and 24 to 26 need no machine at all. Numbers below are for the target pouch. For a different book, run the generator and substitute. The method does not change.
Measure the book
DoMeasure the book closed, in its leather zip cover. Record height, width and depth in inches to the nearest 1/16. Measure the depth at the fattest point, usually the middle, not at the spine.
WhyEvery number in the pattern comes from these three. The leather cover adds up to ¼ inch on each axis, so measuring the bare book gives a pouch that does not close.
RightThree numbers written down. The target book is 7.3 × 4.75 × 3.0.
WrongYou measured the bare book, or the depth at the spine. Both give a pouch too small, and you find out at step 26.
Generate and print the pattern
DoRun the generator with your three numbers, then print the PDF at 100% scale. In the print dialog turn off "Fit to page", "Shrink oversized pages" and "Scale to fit". Those are three names for the same setting and printers have all three.
WhyConsumer printers default to shrinking a document by 3 to 6% to clear their unprintable margin. A 4% error on the panel width is ½ inch, which is one whole seam allowance.
RightMeasure the red 1 inch calibration square on every printed page. It is 1 inch, on all of them.
WrongThe square is 15/16 or 1 1/16. Reprint. Do not scale your cutting to compensate, you will get it wrong somewhere.
Everything downstream is built on this square. This is the cheapest place to catch the error, and the only one where the fix is free.
Prewash and dry both fabrics
DoWash the duck and the lining together, hot wash, then hot tumble dry. No fabric softener. Before you cut anything.
WhyCotton duck shrinks 5 to 8% on the first hot wash. The lining shrinks 2 to 3%. Skip this and the first time the pouch gets wet the outer shrinks around the lining and the whole thing puckers and twists permanently. Prewashing also strips the sizing, a starch the mill adds that makes new duck behave worse under the needle than it should.
RightThe duck comes out softer and slightly smaller. The cut edges have frayed. Expected.
WrongYou skipped it. Nothing looks wrong today.
This one is unrecoverable, and it stays invisible until it is far too late.
Press both fabrics flat
DoPress with steam on cotton until every fold and dryer wrinkle is gone. Press, meaning lift the iron and set it down. Do not slide.
WhyYou cannot cut accurately on wrinkled fabric. An ⅛ inch wrinkle across a 12 inch panel is ⅛ inch of error, and the four panels will not match.
RightBoth fabrics lie flat with no memory of a fold. The bolt's centre crease is gone, or you have planned to cut around it.
WrongYou slid the iron and stretched the fabric off grain. Panels cut from it will be parallelograms and the pouch will lean.
Cut four panels
DoTape the pattern pages together at the registration marks. Lay the duck flat, single layer, grain parallel to the panel's height. Cut two panels 11¾ × 7⅞ from the duck and two more from the lining. Cut the full rectangles. Do not cut the corner squares yet.
WhySingle layer cutting is slower and more accurate than folded. The corner squares stay attached until step 18 because an intact corner gives you a square reference edge for the zipper and the side seams.
RightFour rectangles. Stack them: the edges align within 1/16 inch on all sides.
WrongThey differ by ⅛ inch or more. Recut now. Mismatched panels show up as a twisted pouch at step 25, and the fix at that point is to start over.
Mark the corner squares and the turning gap
DoOn the wrong side of all four panels, mark a 2⅛ inch square at each bottom corner. On one lining panel only, mark the 4½ inch turning gap centred on the bottom edge, with a tick at each end. Mark the top edge of every panel with an arrow.
WhyThe squares set the depth. The gap is the only way the pouch gets turned right side out. Marking now, on flat fabric, is easy. Marking later, on an assembled pouch, is not. Duck canvas looks the same in both directions and you will lose track of which edge is the top.
RightEight squares, one gap on one lining panel, four top edges marked.
WrongYou marked the gap on an outer panel. That gap would be on the outside of the finished pouch.
Fit the machine
DoFit a fresh 90/14 jeans needle. Thread the machine and wind a bobbin with the same polyester thread. Stitch length 3.0 mm. Fit the zipper foot.
WhyEvery setting is deliberate. See the machine safety section.
RightThe machine sews a clean straight line on a doubled scrap.
WrongLoops on the underside mean the top thread is not seated in the tension discs. Rethread with the presser foot up, the only position where the discs are open.
Sew a test seam on scrap
DoStack four layers of duck offcut and sew 4 inches. Then stack eight layers and try again, handwheeling.
WhyThis is where you find out whether the machine, the needle and the fabric agree, on scrap instead of on your panels. Eight layers is what the boxed corners will ask for at step 21.
RightEven stitches top and bottom on both stacks. The eight layer stack needs handwheeling. That is normal.
WrongSkipped stitches, shredding thread, or a punching sound. Change to a 100/16 and retest. If it still fails, stop and read the symptom table. Do not proceed onto the real fabric.
Build the first zipper sandwich
DoWork on the table, not at the machine. Bottom to top: one outer panel right side up; the zipper face down, coil along the panel's top edge, tape edge flush with the fabric edge, hanging off about 1⅛ inch at each end; one lining panel right side down. Clip through all three layers.
WhySewing this stack once, then folding both fabrics away from the zipper, encloses the raw tape edges between the outer and the lining. That is why the finished pouch has no exposed seam anywhere.
RightLooking down you see the wrong side of the lining. Inside, both right sides face the zipper. The two panel edges and the tape edge form one clean line.
WrongIf you can see the zipper from above, one fabric is flipped. This is the most commonly reversed step in the project. It is completely recoverable right now and annoying to fix later.
Sew the first side of the zipper
DoSew the full length at ½ inch, zipper foot riding beside the coil. When the pull is about 2 inches ahead of the foot, stop with the needle down, lift the foot, slide the pull behind the needle, lower the foot, continue.
WhyThe pull is thicker than the needle can clear. Sewing into it breaks the needle and can chip the coil.
RightA straight seam ½ inch from the edge, running the full width, with no bump where the pull was.
WrongThe seam wanders where you moved the pull. Unpick that section and redo it. A wavy zipper seam is visible forever.
Press and topstitch the first side
DoOpen the sandwich so both fabrics fold away from the zipper and the coil is exposed. Press the fold, keeping the iron off the coil, nylon melts. Topstitch through fabric and seam allowance ⅛ inch from the folded edge, at 3.5 mm.
WhyThe topstitching does the real work. It holds the seam allowance permanently away from the coil, so the fabric cannot fold back into the zipper and jam. Without it the pouch snags every time it is opened. On a pouch with eight ribbon bookmarks, that matters more than usual.
RightA crisp fold, ⅛ inch of topstitching parallel to it, the coil running free with fabric held clear on both sides.
WrongThe topstitching sits more than ¼ inch from the fold, leaving a flap of loose fabric beside the coil. That flap is the thing that catches ribbons. Unpick and redo.
Build and sew the second zipper sandwich
DoThe same three layer stack on the other long edge of the zipper, using the second outer and second lining panel. Outer right side up, zipper face down, lining right side down. Sew at ½ inch, moving the pull as before. Before you sew, lay it out flat and look.
WhyThe pouch is a loop. If one panel is attached upside down or inside out, the assembly at step 19 cannot work.
RightOpened flat the piece reads: outer panel, zipper, outer panel, all right sides up. Turn it over: lining, zipper, lining, all right sides up.
WrongOne outer and one lining on the same face. Unpick the second seam and rebuild. Twenty minutes.
Press and topstitch the second side
DoAs step 11.
WhySame reason, other side.
RightBoth sides folded away, pressed, topstitched at ⅛ inch. Zip it fully open and fully shut. Nothing catches.
WrongSomething catches. Fix it now. After step 21 you cannot reach it.
Open the zipper
DoOpen the zipper. Park the pull near the middle of its travel, at least 4 inches from either end.
WhyTwo reasons, and the first is fatal. The pouch gets turned right side out through the gap in the lining bottom seam. The only route from the outer bag's inside to the lining bag's inside is through the zipper opening. If the zipper is closed when you sew the perimeter, that route is sealed, the piece is a closed envelope, and it cannot be turned. You will have sewn a bag that is permanently inside out. Second, the perimeter seam crosses the zipper tape at both ends, and the pull must not be there when the needle arrives.
RightThe zipper is open. You can see through the opening from one side of the piece to the other.
WrongYou will not find out until step 23, after every seam is sewn and trimmed. The recovery is to unpick a full side seam, about 5 inches through six layers, reach in, open the zipper, and resew. It costs an hour and leaves a shorter allowance at the top corner. The piece survives. Your evening does not.
Look at the zipper. Say out loud that it is open. This is the single most common way this pattern is ruined, and it is ruined by people who knew about it.
Match the pieces
DoFold so the two outer panels lie right sides together and the two lining panels lie right sides together. The zipper now runs across the middle of the sandwich. Match all raw edges and clip. Where the zipper crosses the edges, fold its seam allowances toward the lining on both sides so they nest instead of stacking.
WhyThis is the moment the flat piece becomes two bags joined at the zipper. Nesting removes two layers from the thickest point in the project.
RightFour edges aligned within 1/16 inch, and the coil running in a straight line with no kink at either end.
WrongThe zipper kinks up or down where the layers meet. That kink becomes a permanent pucker at the top corner. Re-clip until it lies straight.
Check the zipper ends line up
DoLook at both ends. The coil must cross the side seam line, ½ inch in from the raw edge, at the same height on the outer side and the lining side.
WhyAn offset here doubles when the pouch is turned, and the finished top corners will not match.
RightThe coil crosses the seam line square, at the same point on both halves.
WrongOne side sits ¼ inch higher. Unpick the shorter zipper seam and reset it. Recoverable now, not after step 19.
Clip the whole perimeter
DoClip all the way around: down one outer side, along the outer bottom, up the other outer side, across the zipper end, down the lining side, along the lining bottom, up the other lining side, across the other zipper end. Leave the marked 4½ inch turning gap unclipped, with a clip pointing inward at each end of it as a reminder to stop sewing.
WhyDuck canvas shifts under the foot. A clip every 2 inches holds the alignment you built in step 15.
RightClips all around, gap clearly marked, no pins anywhere near where the needle will run.
WrongYou clipped the gap shut. You will sew straight through it, because you always sew what is clipped.
Cut out the corner squares
DoCut away the eight marked 2⅛ inch squares, cutting through both matched panels at once so each pair matches exactly.
WhyThe perimeter seam has to stop at each notch and start again on the far side. It cannot do that if the corner is still solid. Cutting now, with everything matched and clipped, guarantees the notches on the front and back line up.
RightEight square notches. Each matched pair aligns exactly.
WrongYou cut one layer only, or cut a rectangle instead of a square. An unequal notch gives a twisted corner and there is no fix but a smaller pouch.
Sew the perimeter
DoSew at ½ inch all the way around, in segments. The seam stops at every notch and restarts on the far side of it. Backstitch three stitches at every start and stop, including both sides of the turning gap. Sew: both outer side seams, zipper down to notch; the outer bottom, notch to notch; both lining side seams; the lining bottom, notch to gap and gap to notch. Slow down at the two zipper crossings and handwheel through them. Hammer them first if the stack feels tight.
WhyThis one pass turns four flat panels into two nested bags.
RightA continuous ½ inch seam everywhere except the eight notches and the gap. Both zipper tape ends caught in the side seams.
WrongYou sewed across a notch: unpick it, that corner cannot be boxed otherwise. You sewed the gap shut: unpick 4½ inches. That is the common and easy version of the step 14 mistake.
Trim and hammer the zipper ends
DoTrim the excess zipper tape flush with the raw edge at both ends. Trim the seam allowance at both top corners back to ¼ inch, through tape and both fabrics. Hammer both corners flat.
WhyThe side seam has now stitched through the coil, so the trimmed end cannot come apart and the pull cannot run off. Removing half the allowance takes four layers of bulk out of the point most likely to refuse to turn.
RightFlat corners, ¼ inch of allowance, coil locked under the seam.
WrongYou trimmed closer than ⅛ inch or cut into the stitching. That corner will pull open under load. Resew ¼ inch inside the original line before continuing.
Box the eight corners
DoTake one notch. Press the side seam and the bottom seam open. Open the notch out and pull the two cut edges apart, so the side seam lies directly on top of the bottom seam and the notch becomes one straight raw edge about 4¼ inches long. Pinch the two seams together and check by feel that they interlock, allowances flipped in opposite directions. Hammer the intersection flat. Clip. Sew across at ½ inch, backstitching both ends. Repeat for all eight: four outer, four lining.
WhyThis is the step that makes the pouch a box instead of an envelope. Each stitched notch converts 2⅛ inches of flat corner into 3¼ inches of depth.
RightEight seams. Both bags now have a flat rectangular bottom. Intersections match within 1/16 inch on all eight.
WrongThe two seams do not meet. Off by ⅛ inch you will not see it. Off by ¼ inch and the corner visibly twists. Unpick and redo, it is a 3 inch seam.
Confirm you did all eight, four outer and four lining. Boxing only the outer is a common miss and it makes the lining pull the bottom of the pouch up into a ridge. After turning, the only fix is to reach in through the zipper and sew the lining corners by hand.
Grade the corner seams
DoTrim each of the eight boxed corner allowances back to ¼ inch. On the four outer corners, trim one of the two allowances to ⅛ inch and leave the other at ¼.
WhyThe boxed corner is the thickest point in the finished pouch, six layers of duck. Staggering the two allowances stops them forming a hard ridge under the fabric.
RightThe corners feel flexible. Nothing is cut closer than ⅛ inch from a stitch line.
WrongYou cut through a seam. Resew inside the original line before you turn the pouch.
Turn the pouch right side out
DoReach into the turning gap. Pull the outer bag out through the gap, through the lining, a handful at a time. It will not want to come. Work the top corners out last, pushing each from the inside with the blunt point turner.
WhyThis is the payoff of every trimming and hammering step above.
RightThe pouch emerges right side out, outer fabric outside, lining inside out and hanging off the end, zipper working.
WrongIt will not pass through at all. Two causes. Either the zipper is closed, see step 14, or the gap is too small: unpick another inch at each end. Never force it. Duck canvas will not tear but the lining will, and a torn lining seam mid-turn is a bad repair.
Close the turning gap
DoFold both raw edges of the gap ½ inch inside, so the fold continues the seam line. Press. Close it with a ladder stitch by hand: pick up ¼ inch along one fold, cross, pick up ¼ inch along the other, pull snug every few stitches. Knot and bury the tail.
WhyThe gap is on the lining bottom, inside the pouch, where nobody sees it. A hand closed seam there is flatter than a machine one and does not need the machine back. If you still have the machine, edgestitching it closed at ⅛ inch is faster and equally strong.
RightClosed, the seam line reads continuous, no raw edges visible.
WrongIt puckers. Nobody will ever see it. Move on.
Settle the lining and press
DoPush the lining down into the outer bag and work its four boxed corners into the outer bag's four corners by hand. Roll the top edge between your fingers so the zipper sits exactly at the top with no lining peeking out. Press the whole pouch: the top edge hard along the zipper, keeping the iron off the coil, then the four vertical edges, then the four bottom edges, then stand it up and press the bottom flat.
WhyPressing is what makes a home sewn bag look bought. Until you press it, the pouch is a bag of soft folds. Every crisp edge you set now is permanent in duck canvas.
RightTwelve crisp edges: four vertical, four around the bottom, four around the top. It holds a rectangular shape empty.
WrongThe lining shows above the zipper on one side. Roll that edge again between finger and thumb and press it hard.
Load the book
DoGather all eight ribbon bookmarks and lay them along the length of the book, or fold them inside it. Close the leather cover over them. Slide the book in lengthwise, spine first. Hold the ribbons clear with one finger while you close the zipper.
WhyThe eight ribbons are the reason this pouch uses a coil zipper. A ribbon crossing the coil as you close it will get caught. In a coil it releases when you back the pull off, in a crease and not in pieces.
RightThe book sits with about ⅛ inch of slack on every side. The zipper closes without pressure. No ribbon crosses the coil.
WrongThe zipper strains, or the pouch bulges into a barrel. The book is bigger than the numbers in step 1. Nothing to be done to this pouch. Remeasure and make the next one ¼ inch larger in the offending axis, which is one line in the generator call. If a ribbon does jam: stop pulling, back the pull off the way it came, free the ribbon, close it again. Never force a zipper over a ribbon, that is when a coil zipper does get damaged.
06 · Failure
Where beginners fail
Ranked by what it costs. Four of these cannot be undone.
| Step | Failure | Recoverable? |
|---|---|---|
| 3 | Not prewashing | No. Fine until the first wash, then permanently puckered. |
| 5 | Panels cut unequal, or off grain | No. Recut before assembly, or accept a twisted pouch. |
| 18 | Corner notches cut unequal | No. The only fix is a smaller pouch. |
| 26 | The book does not fit | No, for this pouch. One parameter change for the next one. |
| 14 | Zipper closed during the perimeter seam | Yes, expensively. Unpick a full side seam, about an hour. |
| 2 | Printed at the wrong scale | Yes, free, if caught before cutting. Not at all afterwards. |
| 21 | Boxing the outer but not the lining | Yes. Sew the lining corners by hand through the zipper. |
| 9, 12 | Zipper sandwich layers in the wrong order | Yes. Twenty minutes with a seam ripper. |
| 19 | Sewing the turning gap shut | Yes. Unpick 4½ inches. |
| 11, 13 | Topstitching too far from the fold | Yes. Unpick and resew. Worth doing, it is the anti-snag feature. |
| 22 | Trimming through a stitch line | Yes. Resew inside the original line. |
Time
| Phase | Steps | Time | Machine |
|---|---|---|---|
| Shopping | n/a | 1 h | no |
| Prewash and dry | 3 | 2 h, unattended | no |
| Print, tape, verify, cut, mark | 1–2, 4–6 | 1 h 30 | no |
| Zipper | 7–13 | 1 h | yes |
| Assembly | 14–23 | 1 h 30 | yes |
| Finish | 24–26 | 45 min | no |
Machine session, 2 hours 30 for a first build. Book three hours of access. A second pouch takes 1 hour 15 at the machine.
07 · Troubleshooting
Symptom, cause, fix
Indexed by the step it went wrong at.
Machine
| Symptom | Fix |
|---|---|
| Loops of thread on the underside | The top thread is not seated in the tension discs. Almost never a bobbin problem despite appearances. Raise the presser foot, which opens the discs, and rethread completely from the spool. |
| Thread snaps every few inches | Dull or burred needle, cheap thread, thread caught on the spool notch, tension too tight, in that order. Change the needle. That fixes it four times out of five. |
| Skipped stitches | Needle too small, dull, or universal instead of jeans. Fit a fresh Jeans 90/14. If it persists on eight layers, go to 100/16. |
| A hard punching sound, the needle flexes | Stop. See the machine safety table. Continuing risks the machine's timing, and it is not your machine. |
| The needle broke | Find every fragment, including any inside the bobbin case. Turn the handwheel one full revolution by hand: if it catches or grinds, the hook may be damaged and the owner needs to know. If it turns freely, fit a new needle and continue. |
| It will not sew through a boxed corner | Hammer the intersection, then handwheel. If the handwheel will not turn under firm pressure, back out, trim that corner's allowances to ¼ inch, hammer again, restart the seam an inch before the intersection. |
| Fabric gets pulled down into the needle plate at the start of a seam | Start ½ inch in from the edge, sew backward to the edge, then forward. Or hold both thread tails behind the foot for the first three stitches. |
Zipper
| Symptom | Step | Fix |
|---|---|---|
| The foot pushes the coil away and the seam wanders | 10 | The foot is on the wrong side of the needle. Zipper feet attach in two positions, one per side. Swap it. |
| A visible jog where you moved the pull | 10 | Unpick 2 inches either side and resew in one pass, with the pull moved before you start. |
| The finished zipper catches fabric every time | 11, 13 | The topstitching is too far from the fold, leaving a flap. Unpick it, re-press the fold hard, topstitch at ⅛ inch. Do it before assembly, after turning you cannot reach it. |
| The two sides of the zipper are offset | 16 | Unpick the second zipper seam entirely and resew, matching the coil at both ends before you clip. Do not try to ease out a ¼ inch offset, it doubles when turned. |
| A ribbon bookmark is caught in the coil | 26 | Stop pulling. Back the pull off the way it came. Work the ribbon free with fingers, not with anything pointed. A nylon coil releases. This is the failure mode it was chosen for. |
| The pull came off the end | n/a | Walk it back on, coil first, one side at a time, with tweezers. After step 19 the coil ends are locked by the side seams and it cannot come off at all. |
Construction, turning, fit
| Symptom | Step | Fix |
|---|---|---|
| Opened flat, one panel is right side down | 12 | Unpick that zipper seam and rebuild the sandwich in the order given at step 9. Do not proceed, the assembly will not work. |
| You sewed the perimeter with the zipper closed | 14 | Unpick one full lining side seam, zipper down to the notch, about 5 inches through six layers. Reach in, open the zipper, resew. Budget an hour. The piece is not ruined. |
| You sewed the turning gap shut | 19 | Unpick 4½ inches. Five minutes. The mild version of the same mistake. |
| You sewed across a corner notch | 19 | Unpick back past the notch on both sides and resew, stopping at the notch. |
| A boxed corner's seams do not meet | 21 | Unpick the 4¼ inch corner seam and redo it. Align by feel, pinching the two seams until they interlock. Do not trust your eyes, the layers hide the seams. |
| The finished pouch twists, one bottom corner sits high | 18, 21 | Check the corner seams first, those are repairable. Unequal notches are not. |
| The pouch will not come through the turning gap | 23 | Check the zipper is open. That is the cause most of the time. If it is open, unpick another inch at each end and pull a handful at a time. Never force it. |
| A top corner will not push out square | 23 | Trim more bulk. Turn it back out, trim that corner to ¼ inch and the tape flush, hammer, turn again. Push from inside with a blunt turner, never with scissors. |
| The lining shows above the zipper | 25 | Roll the top edge and press hard. If it shows by more than ¼ inch, that lining panel was cut larger than the outer: unpick its zipper seam and resew ⅛ inch deeper. |
| The lining pulls the bottom up into a ridge | 21 | Its boxed corners were not sewn. Reach in through the open zipper and sew each lining corner by hand with a backstitch. Awkward, effective, invisible from outside. |
| The book rattles around | 26 | Too much ease. Reduce --ease-opening, the largest of the three by default and the usual culprit. |
| The zipper strains over the book, or the pouch bulges into a barrel | 26 | The height or the depth is short. Add ¼ inch to --ease-opening or --ease-depth and generate a new pattern. There is no alteration that makes a finished boxed pouch bigger. |
Prevention, in one list. Verify the printed calibration square before cutting. Prewash. Cut all four panels the same size, on grain. Open the zipper before sewing the perimeter. Cut the notches through both matched layers at once. Box all eight corners, lining included. Hammer every seam intersection before sewing across it. Change the needle when anything sounds wrong.
08 · Glossary
Every term used here
Nothing on this page assumes you already know a word.
- Backstitch
- Three or four stitches sewn in reverse at the start and end of a seam, to lock it. A seam without it pulls out from the end.
- Bobbin
- The small spool under the needle plate that supplies the underside of every stitch. It runs out silently. Wind two before you start.
- Boxed corner
- A rectangular bottom made by removing a square from each bottom corner of a flat panel, then stitching the resulting straight edge closed.
- Clip
- A spring clip used instead of a pin on fabrics too thick to pin. Duck canvas is one of them.
- Duck canvas
- A plain woven cotton, tighter and heavier than regular canvas, sold by weight in ounces per square yard. 10 oz is mid weight, the stuff of tote bags and work aprons.
- Ease
- Slack deliberately added between the object and the thing containing it. Without it, a pouch cut to the book's exact size will not close, because the fabric itself has thickness.
- Edgestitch
- Stitching 1/16 to ⅛ inch from a finished edge. Used here only to close the turning gap by machine.
- Feed dogs
- The metal teeth in the needle plate that pull the fabric backward under the foot. They do the feeding. You do not. Pulling against them is what bends needles.
- Grade a seam
- Trim the layers of a seam allowance to different widths, so the edges do not form one hard ridge under the fabric.
- Grain
- The direction of the woven threads. Lengthwise grain runs parallel to the selvedge and is the stable direction. Bias is 45 degrees to both, and stretches. Cut every panel on grain or the pouch leans.
- Handwheel
- The wheel at the right end of the machine that drives the needle by hand, for walking through a stack too thick to sew at speed. Turn it toward you, always.
- Hook
- The rotating mechanism under the needle plate that catches the top thread and passes it around the bobbin. It sits about a millimetre from the needle's path. A bent needle strikes it, and that is the expensive failure.
- Ladder stitch
- A hand stitch that closes a folded opening invisibly, by picking up a short length inside one fold, crossing, and picking up a short length inside the other.
- Nesting
- Arranging two seam allowances at a crossing so one folds left and the other folds right, halving the thickness of the intersection.
- Notch
- Here, the square removed from a bottom corner to make a boxed corner.
- Presser foot
- The metal foot holding the fabric against the feed dogs. A zipper foot is narrow and notched on one side, so the needle can sew close beside a coil: required. A walking foot has its own feed mechanism that pulls the top layer at the same rate as the bottom: helpful on duck canvas, optional.
- Press
- Lift the iron, set it down, hold, lift, move. Not the same as ironing, which slides. Sliding a hot iron across woven fabric stretches it off grain.
- Right side, wrong side
- The face meant to be seen, and the other one. On duck canvas the two look nearly identical. Mark one and commit.
- Seam allowance
- The distance from the raw edge to the stitch line. ½ inch on every seam here, included in every number the generator prints. Generous on purpose, so there is enough fabric to unpick a seam and sew it again.
- Selvedge
- The finished, non-fraying edge running along both sides of the fabric off the bolt. Lengthwise grain is parallel to it.
- Sizing
- Starch or resin applied at the mill to make new fabric feel crisp on the bolt. It washes out, which is one reason to prewash.
- Stitch length
- How far the feed dogs advance between stitches, in millimetres. 3.0 mm for construction here, 3.5 mm for topstitching.
- Tension discs
- Two spring loaded plates gripping the top thread. They open when the presser foot is raised, which is why the machine must always be threaded with the foot up.
- Topstitch
- A visible line of stitching through the fabric and the seam allowance beneath it, parallel to a seam. Structural here, not decorative: it is what holds the fabric permanently clear of the zipper.
- Turning gap
- A deliberately unsewn length of seam, 4½ inches in the lining bottom, through which the whole pouch is pulled right side out. Closed by hand afterward.
- Zipper anatomy
- Coil, the continuous nylon spiral that forms the teeth. Tape, the woven strip it is attached to, which is what you sew through, never the coil. Pull, the moving part, thicker than anything else on the zipper. Stops, the blocks at each end that keep the pull on: this pattern discards them, because the side seams stitch through the coil and take over that job. Size (#3, #4.5, #5, #8), the approximate width of the closed coil in millimetres.
09 · Downloads
Take the pattern with you
Print the PDF at 100% scale. Measure the calibration square before you cut anything.
To draft for a different book, three numbers change:
python3 generate_pattern.py \
  --book-height 7.3 --book-width 4.75 --book-depth 3.0 \
  --name "Breviary Pouch" --slug breviary-pouch
It writes the SVG, the tiled PDF and the cut list, and prints the cut list to the terminal. Ease is adjustable too: --ease-length, --ease-opening, --ease-depth and --seam-allowance, all in inches.